Tuesday, November 22, 2011

Birdhouse Fun!


The Route 66 stamp from Viva Las Vegastamps! was my inspiration this week for this cute little birdhouse ornament.


I started with some basic supplies:

Route 66 stamp from Viva Las Vegastamps!
Wooden Birdhouse Ornament
Scrapbook paper scraps
Vintage Gold Fine Glitter
Distress Ink - Vintage Photo
Distress Crackle Paint - Rock Candy

I cut scrapbooking paper just a tad smaller than each side of the birdhouse - distressed each edge and glued it down using 3D Crystal Lacquer.  I inked the edges with Distress Ink in Vintage Photo to give it a rustic look and to take away the new look of the wood.

For the roof - I used paper that had small license plates (Tim Holtz) which look like shingles and gave it a coat of Rock Candy Distress Crackle to make it look aged.  At the bottom I added a layer of Gem Particles and finished off the bottom edge with fine glitter.  The stamped image was stamped and embossed, cut out and aged with Distress Ink in Old paper and Vintage Photo.

This was a fun FAST project!

For more creative inspiration - visit Sakura Hobby Crafts blog
and for product info, check out

Enjoy!


Tuesday, November 8, 2011

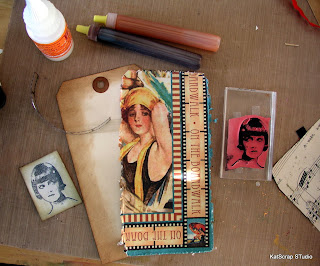
Summer Memories Vintage Tag


This month I'm featuring a stamp from VivaLasVegaStamps! along with Sakura Hobby Craft products!  I created this fun vintage beach tag using the following items.

Manila Tag
Scrapbook paper scraps
Flourish rubberstamp - Tim Holtz
Film Strip Ribbon - Tim Holtz
Vintage Ticket sticker
Hinge Clip - Tim Holtz
charms from my stash
Distress Inks - Old Paper & Vintage Photo


I started with distressing the edges of the manila tag using distress ink.  I cut my scrapbook paper scrap the size of the tag and distressed the edges using a Zutter Distrezz It All to really rough up the edges and make it a little smaller than the tag.  I stamped the girl image on plain white cardstock using black distress ink and embossed her with clear embossing powder.  I aged the white cardstock with distress ink in old paper and vintage photo on the edges.


I stamped a flourish image over the scrapbook paper using StazOn ink in black and outlined some of the flourish with brown Crystal Color Lacquer.  I set this aside for a few hours before I finished assembling the tag.


Creating the film strip was a little time consuming - but turned out really cool!  I just cut small face images from scraps of scrapbooking paper - here I was using Graphic 45's Bathing Beauties - one of my all time favs!  I placed a dot of Crystal Lacquer on top of the image and then pressed the film strip over it.  To finish the tag, I adhered a vintage ticket sticker behind the clipped on film strip ribbon and added some fun charms.

You can find amazing rubberstamps from VivaLasVegaStamps! here

Visit Sakura Hobby Craft's website for product info & project ideas.

and visit Sakura's Blog to see all of their design teams creations!

Have a great week!